
Gently Caressing History
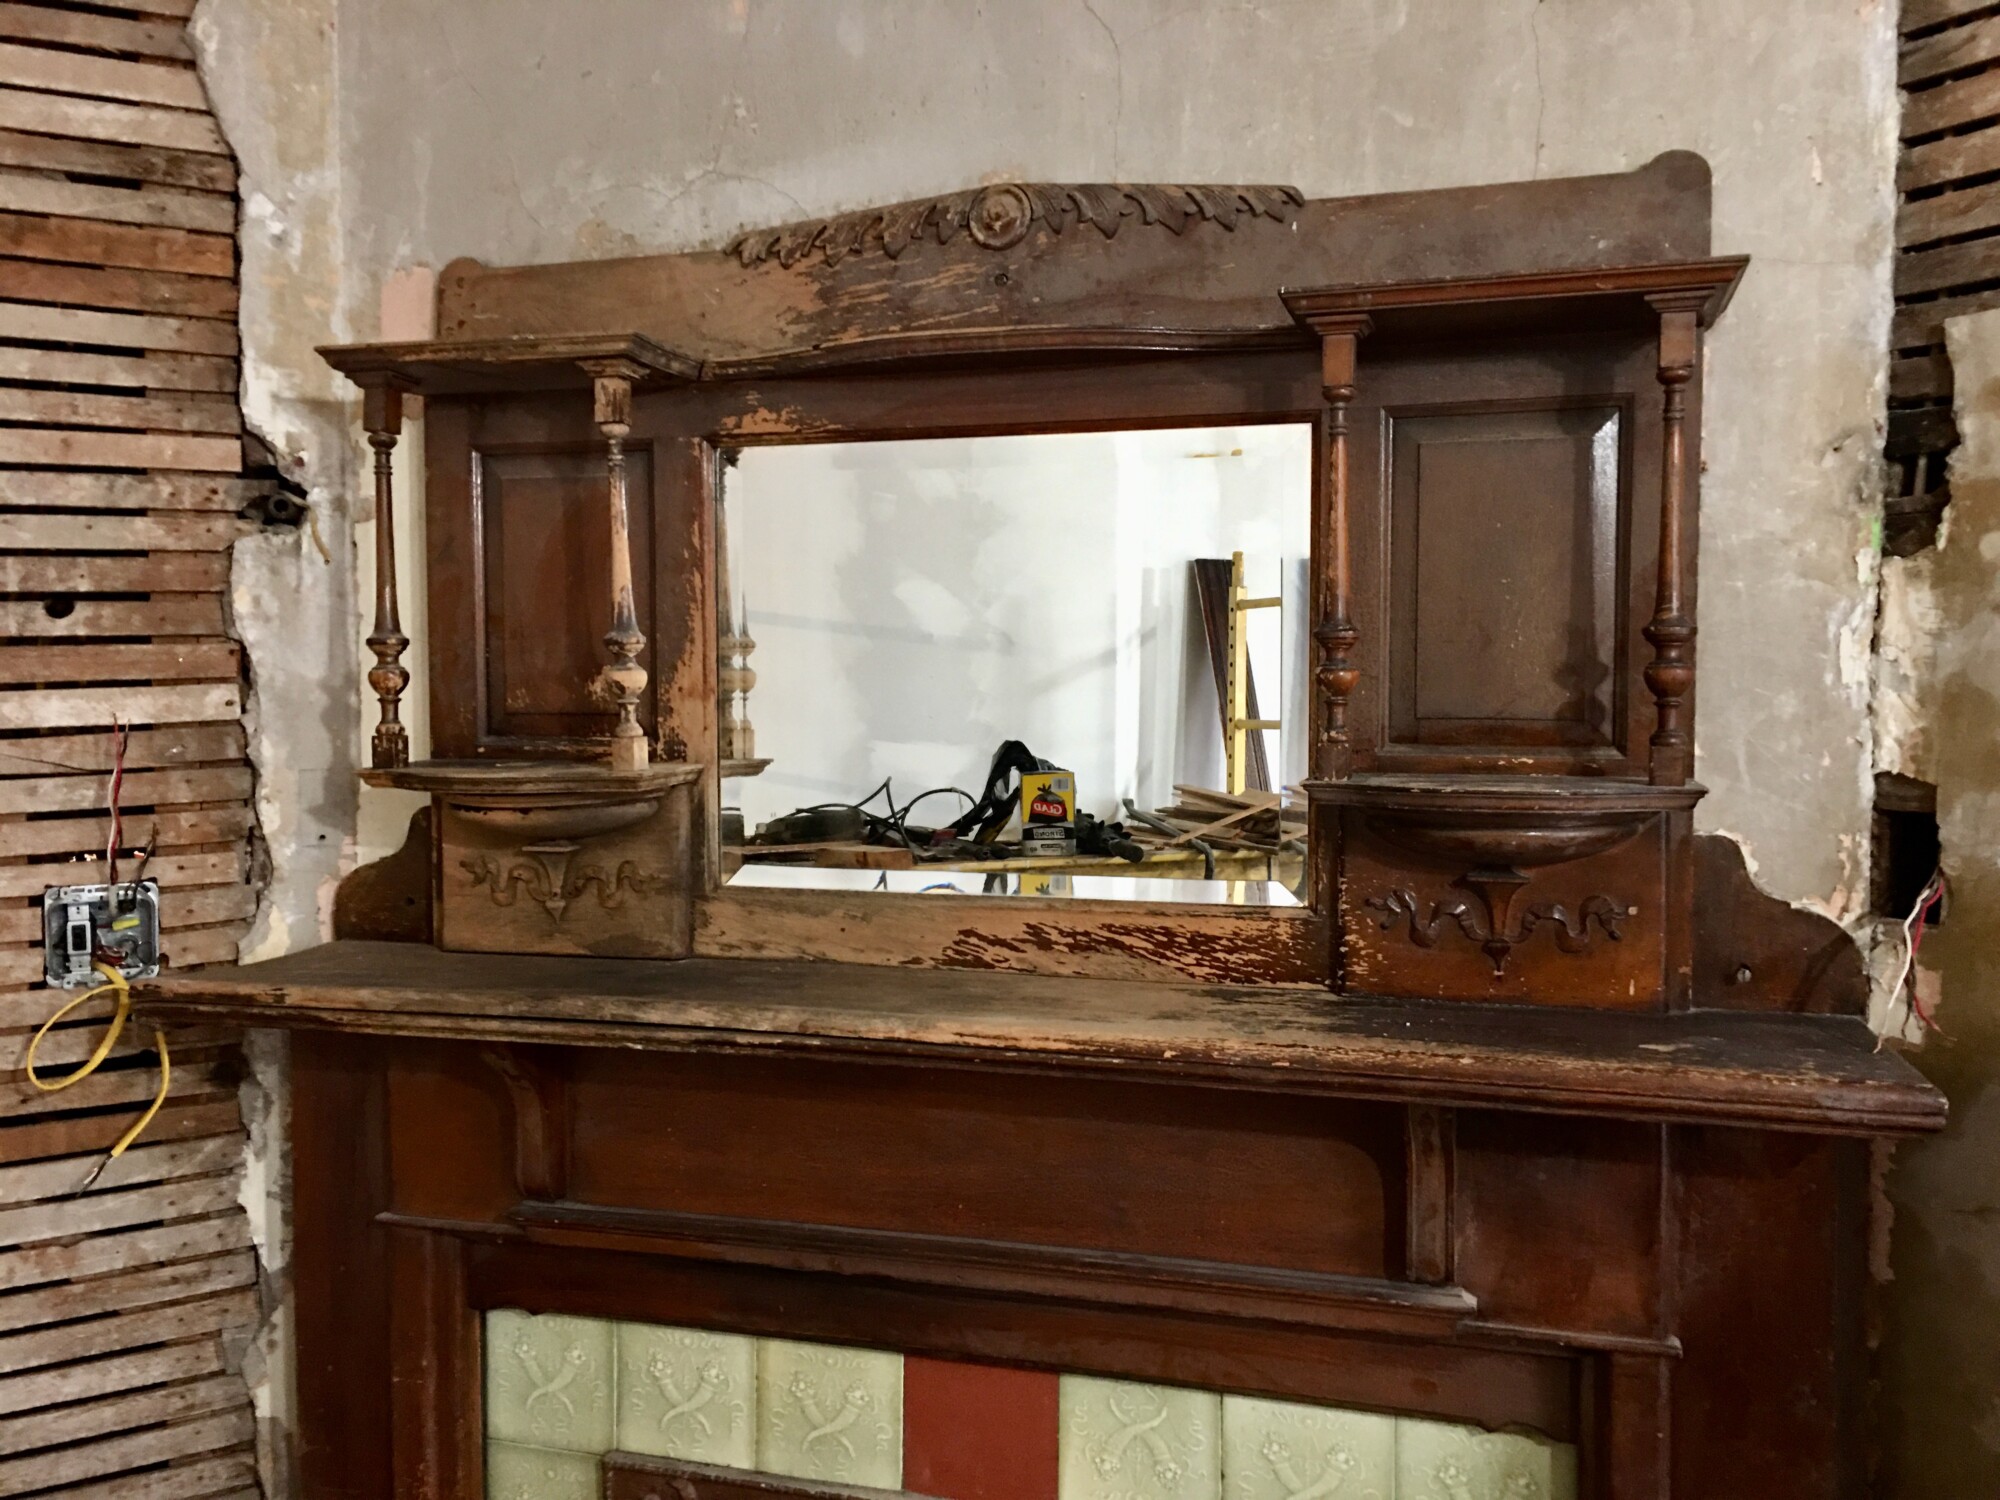
The mantel in the Octagon Bedroom is in poor shape.
The mantel is a catalog piece. It was not particularly expensive in its day. The wood had a tinted shellac finish originally, making the wood look better than it was.
In time, a roof leak developed, and for many decades a steady drip drip drip fell upon the left side of the mantel, eroding its tinted shellac finish.
And, too…the left side of the “shelf” bowed.
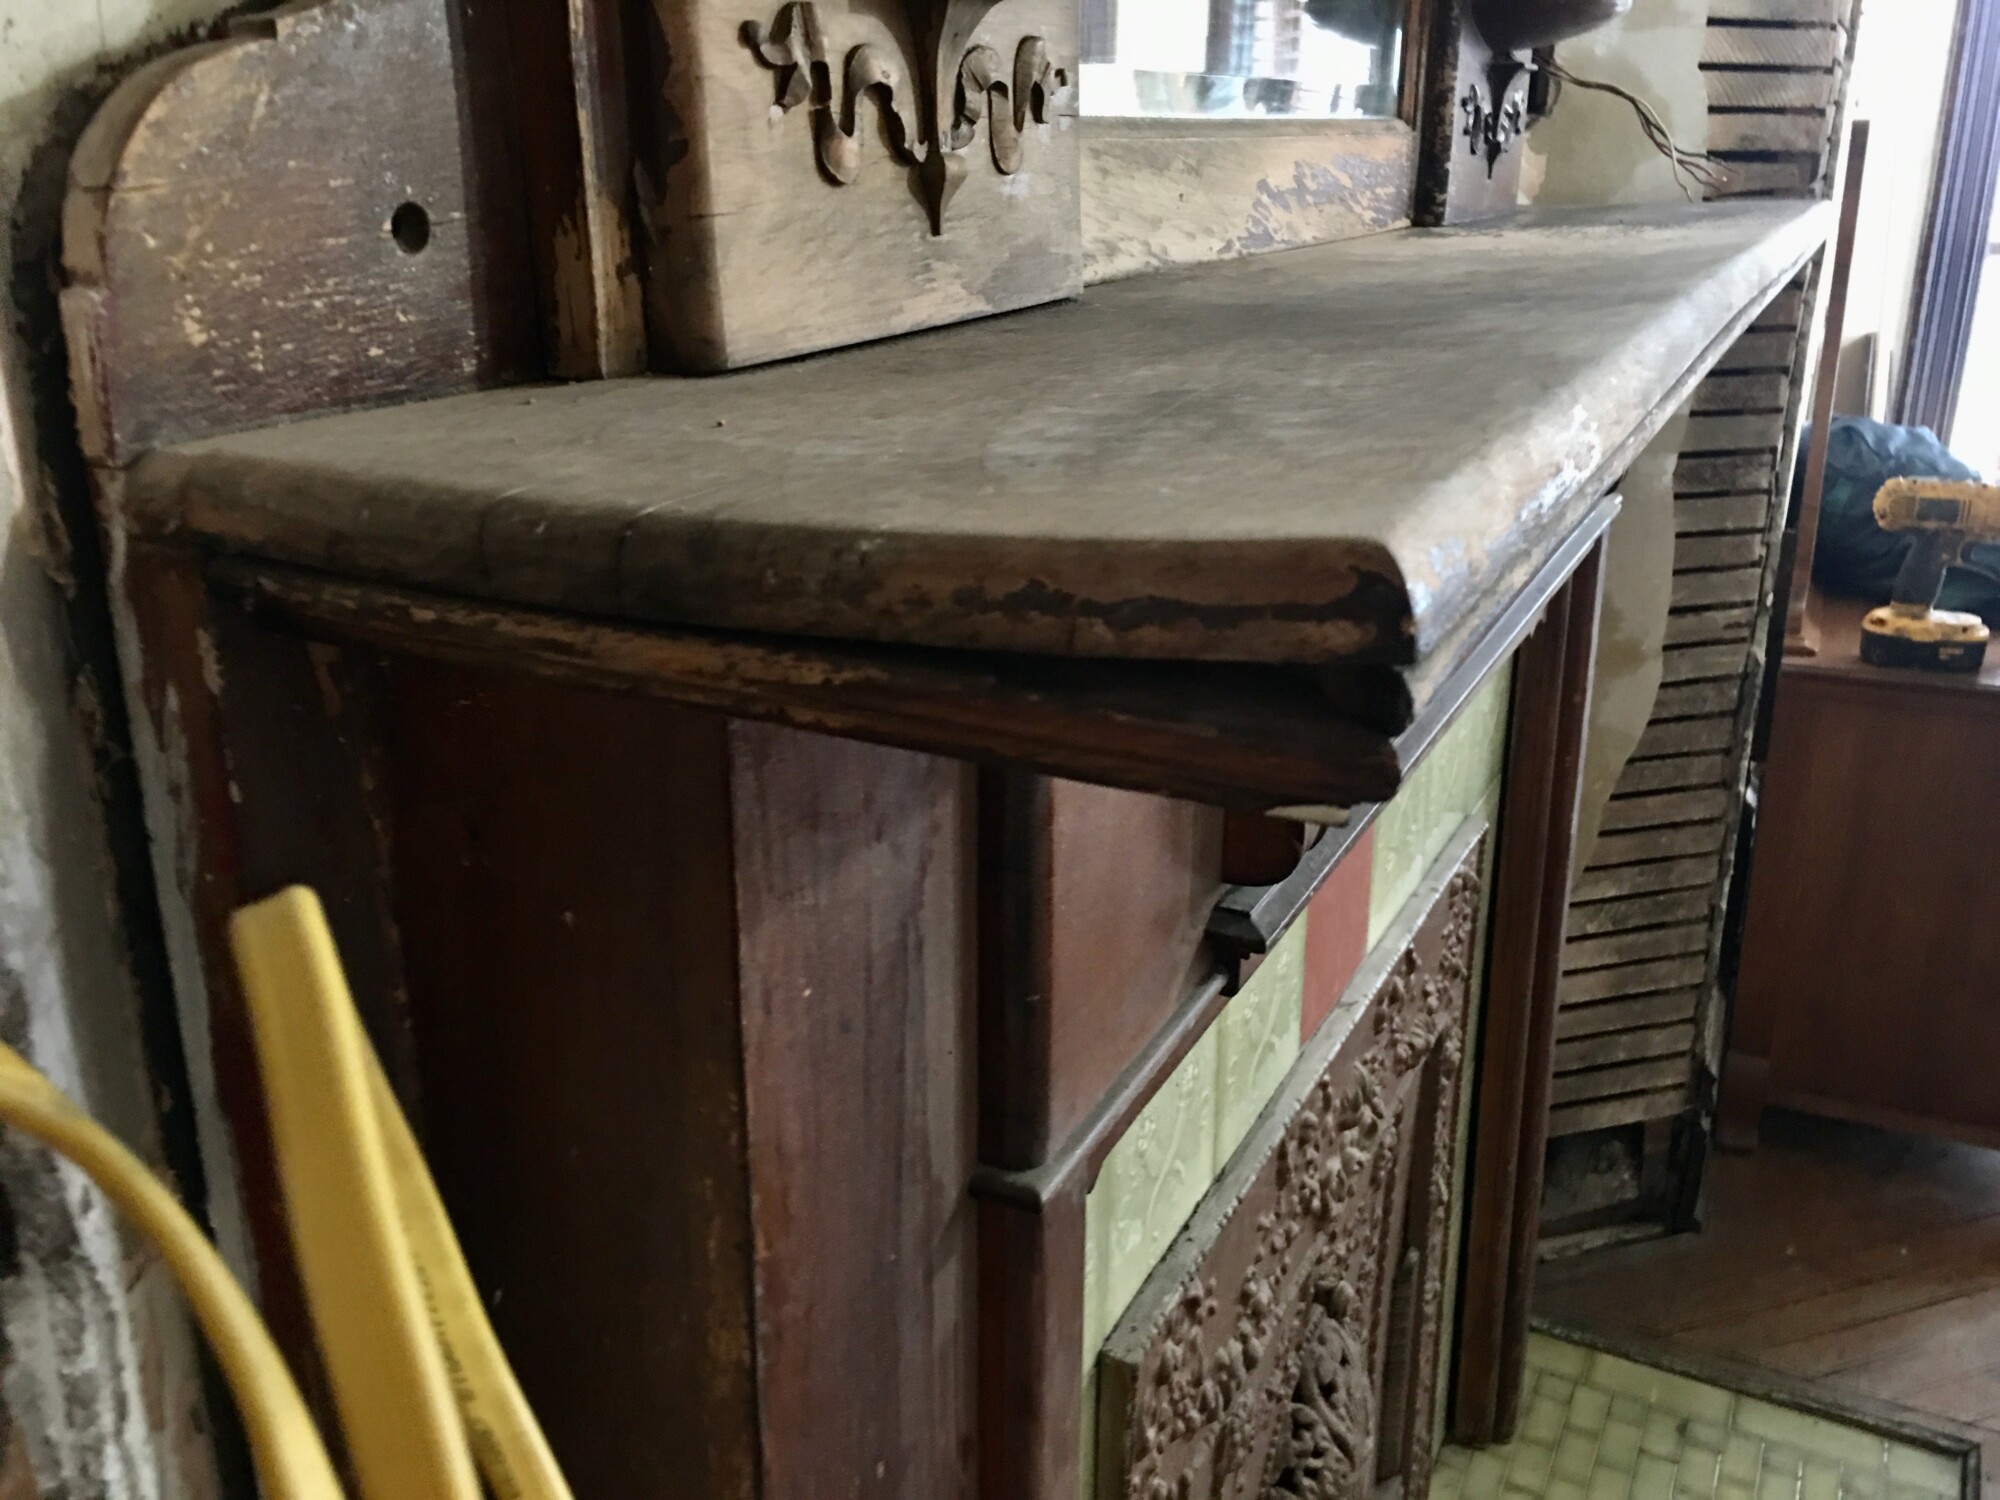
This is bad. Under the shelf are trim pieces. Also, see the wood “swags” just above the shelf? There is a story there.
Since buying the house in 2014, the bowed shelf has bothered me. While the room is a wreak, the mantel seemed particularly depressing, like a kitten left out in the rain. The poor dear.
Yesterday, I decided that it would be nice to begin the process of restoring the mantel. The surrounding room will take many, many months to restore, but it seems a good idea to restore the mantel first, as a kind of inspiration piece.
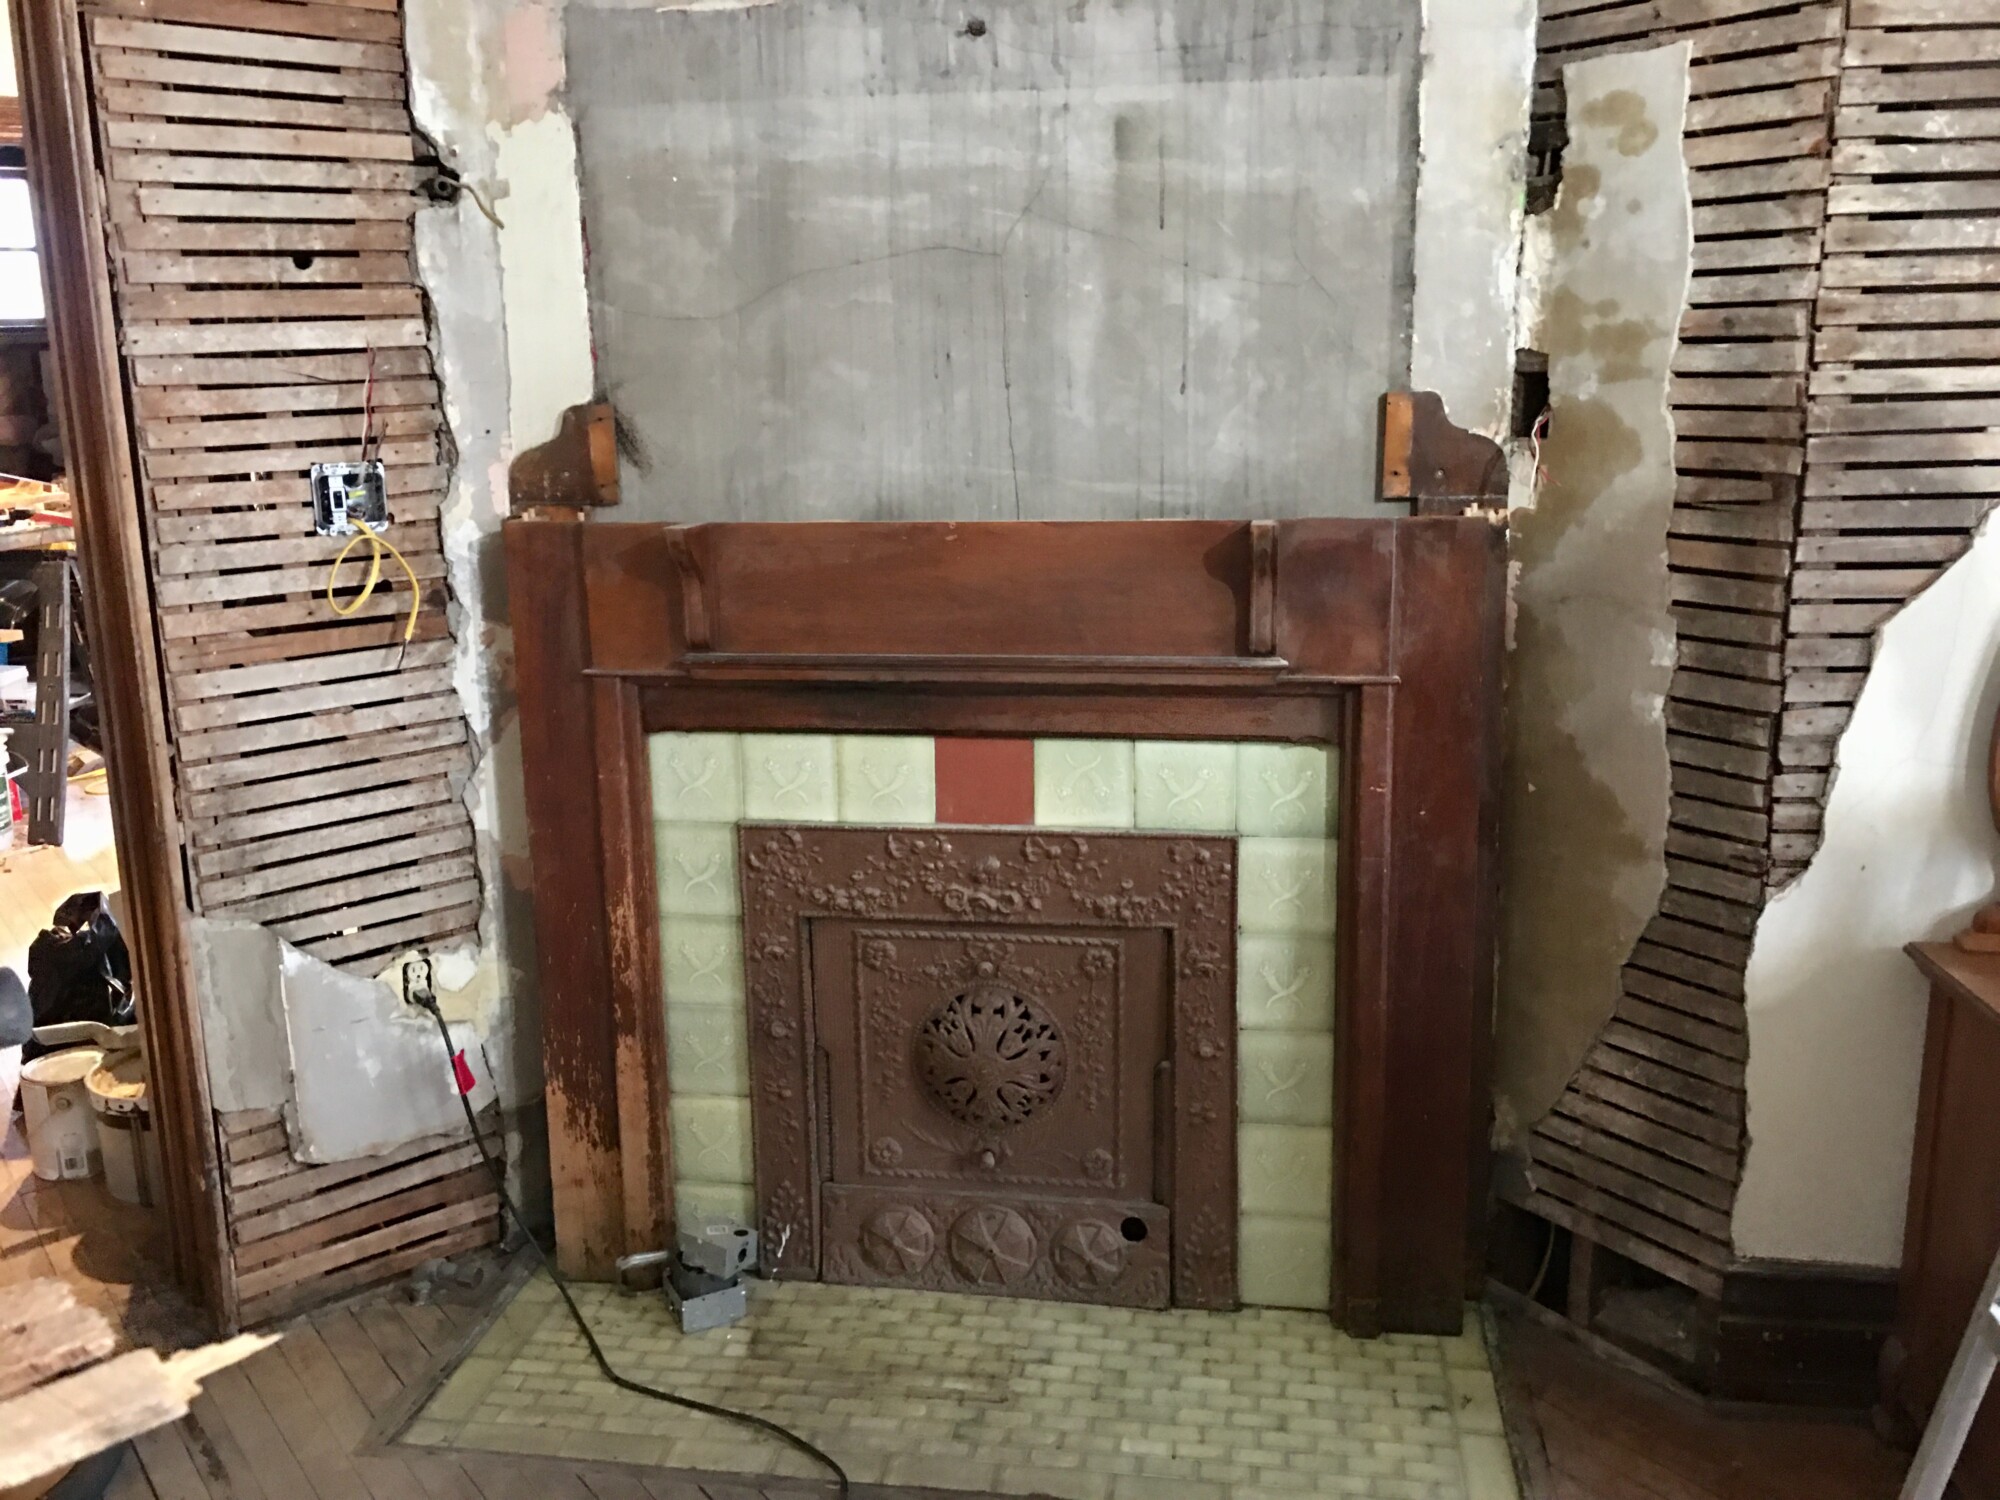
The overmantel came off easily. It took some figuring to ascertain how to remove the shelf.
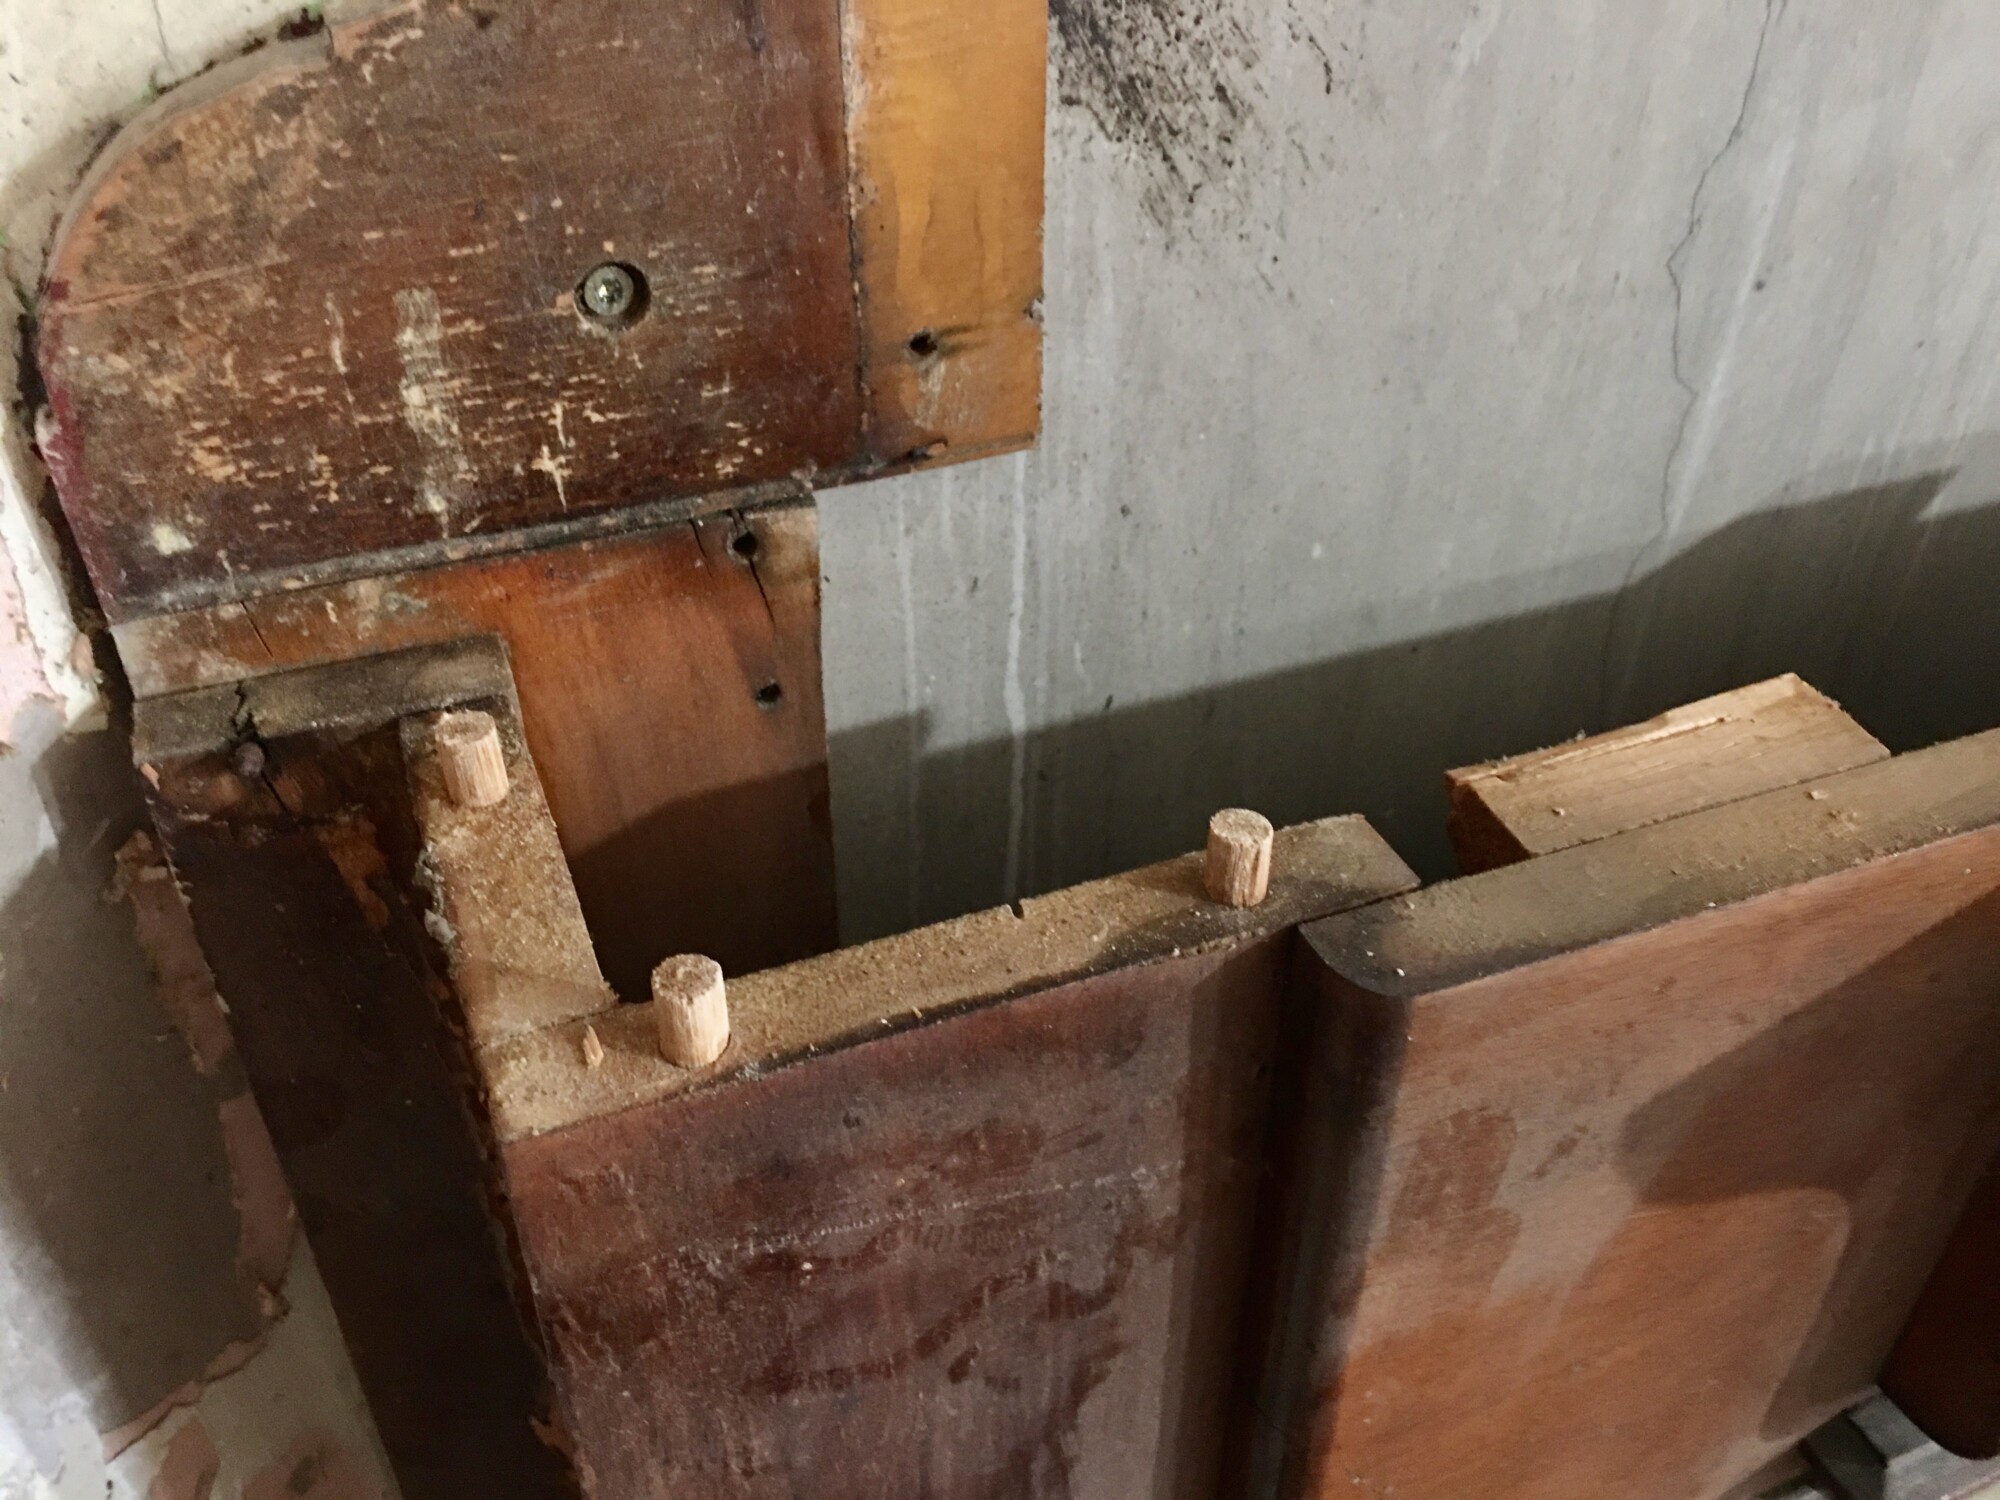
Luckily, it was mostly held in place by wood dowels, which do not appear to have been glued. Whew!
Decades ago, in Old House Journal, I read about a trick to unwarp boards:
Lay the board down on wet grass, on a sunny, hot day. Warp side down. Wait a few hours. The sun will “lift” the warp! Be careful about the timing though. Too much sun and the board will warp in the opposite direction!
This is an effortless, free fix, and I have had nothing but success with the method for four decades. However, it is now too cold for this to work on the shelf, so this will be a project for the spring. In the meantime, I will restore the rest of the mantel, and then reinstall it, with the still bent shelf (for now).
I am excited about this small project!

13 Comments
Leave a Reply Cancel Reply
Your email address will NEVER be made public or shared, and you may use a screen name if you wish.
I am so happy that you are restoring the mantel! The other mantels in the house are so beautiful. It will be very inspiring to see it restored to its former glory.
Ross, I have restored warped wood by wetting it, and then laying it on a flat surface (my vinyl back hallway) with weight covering the entire surface. Since I am a bookworm and have tons of heavy books, I layered the board with books covering it entirely, with the books in plastic bags to protect them. After a few days the wood is dry, and flat.
Nah, just get a wet/moist towel, put it on something flat, warped wood on top of that and something heavy on top of the wood to flatten it out. No need to wait until spring. 🙂
Imagine finding the wooden swags among similar colored leaves? Excellent eye!
Though the methods above sound easier, perhaps your tried-and-true wet grass method could be sped along with some clear plastic over the workpiece, to make a sort of greenhouse to get the temps you need?
Super ❤ on learning this technique.
I have used the technique that you describe on warped boards myself. I have found that the best results come when the board has warped along its whole length rather than just the end as you describe. My experience has been that the end which has not warped will warp in the opposite direction so that you will still have a warped board.
You could try the wetting and laying on flat surface with a lot of books on top idea, although that wouldn’t be my first choice. The thing to keep in mind is that wood moves throughout its life. The amount of motion is far greater across the width of a board than the length. If you were to try to clamp and glue the board to the mantle, the motion of the wood could, and likely would, literally rip the wood, creating large, uneven cracks. The wider the board the more the motion. The reason that the dowels were not glued was to prevent this from happening.
If the top were not a single board, the wet grass and sun idea could be a disaster because each piece of wood that was glued up for the top would warp along its width.
My suggestions would be:
1. Do all of the work in the octagon bedroom. It is a conditioned space and the very humidity outside on a hot day would considerable increase the moisture in the top. There would be considerable motion when it was brought inside.
2. Why wet it down? You are trying to get the wood to want to stay where it is flattened.
3. You can make a few simple clamping block from a piece of 2×4 that should work especially well with only one end being cupped. One block should be a 2×4 with a length that is the width of the top. You will want a narrow soft wood shim that can be placed in the center of the convex area. The other two can be any size scraps that will keep the clamp ends from marring the surface that will show. With the narrow side of the 2×4 facing the top’s bottom surface. Start clamping the edges toward the 2×4. You should only tighten until it is a little tighter than snug. There is no need to tighten the clamps all of the way flat in one go because it can crack the board. Every few days you can tighten the clamps a little bit until the board appears flat. You can check the progress by releasing the clamps a little to see how it is working before each tightening. You can record the changes in cupping by holding a scrap of lumber at the end, and drawing a pencil line on the scrap. After clamping it all of the way flat, there may be a little cupping remaining when you release the clamps. If so, then the shim should be placed between the 2×4 and the center of the cup going with the top’s grain. Then clamp it a little past flat until you can release the clamps and it is as flat as you like. You can also clamp additional 2×4 blocks in other spots along the top for additional pressure.
This will take an indeterminate amount of time, sometimes it goes quickly and sometimes it takes a while.
Stewart, may I pick your brain about a top of a dresser that warped up? It’s apiece from my aunts attic. I was thinking of stripping the paint off the top, getting it damp/wet with a towel, then clamping it down slowly to unwrap the bend. The internet doesn’t provide many resources for furniture, just warped slab wood.
Has that mantel been removed and reinstalled by the Rodaks? It looks like it’s fixed to the wall with Torx screws and those haven’t been around for long.
Ragnar, I installed the screws. I’ve removed the mantel several times.
I have learned so much from you! So excited to learn of this warp repair. I am restoring a large 1900-ish George A Clark thread cabinet and wasn’t sure how to fix its bowed top. Looking forward to the Spring, for both of us. Thanks!
What’s with the lone red tile?
It appears to be a very poor choice for a replacement tile.