
Have You Had Experience With Peel-Away Paint Stripper?
In 2020, I had the original plaster and wood in the 1894 Cross House kitchen professionally analyzed to ascertain the original colors/finishes.

And the results. The wood was simply an amber shellac, and the walls were a gloss “stone”.
OK! How exciting! It is like vanished history springing to light!
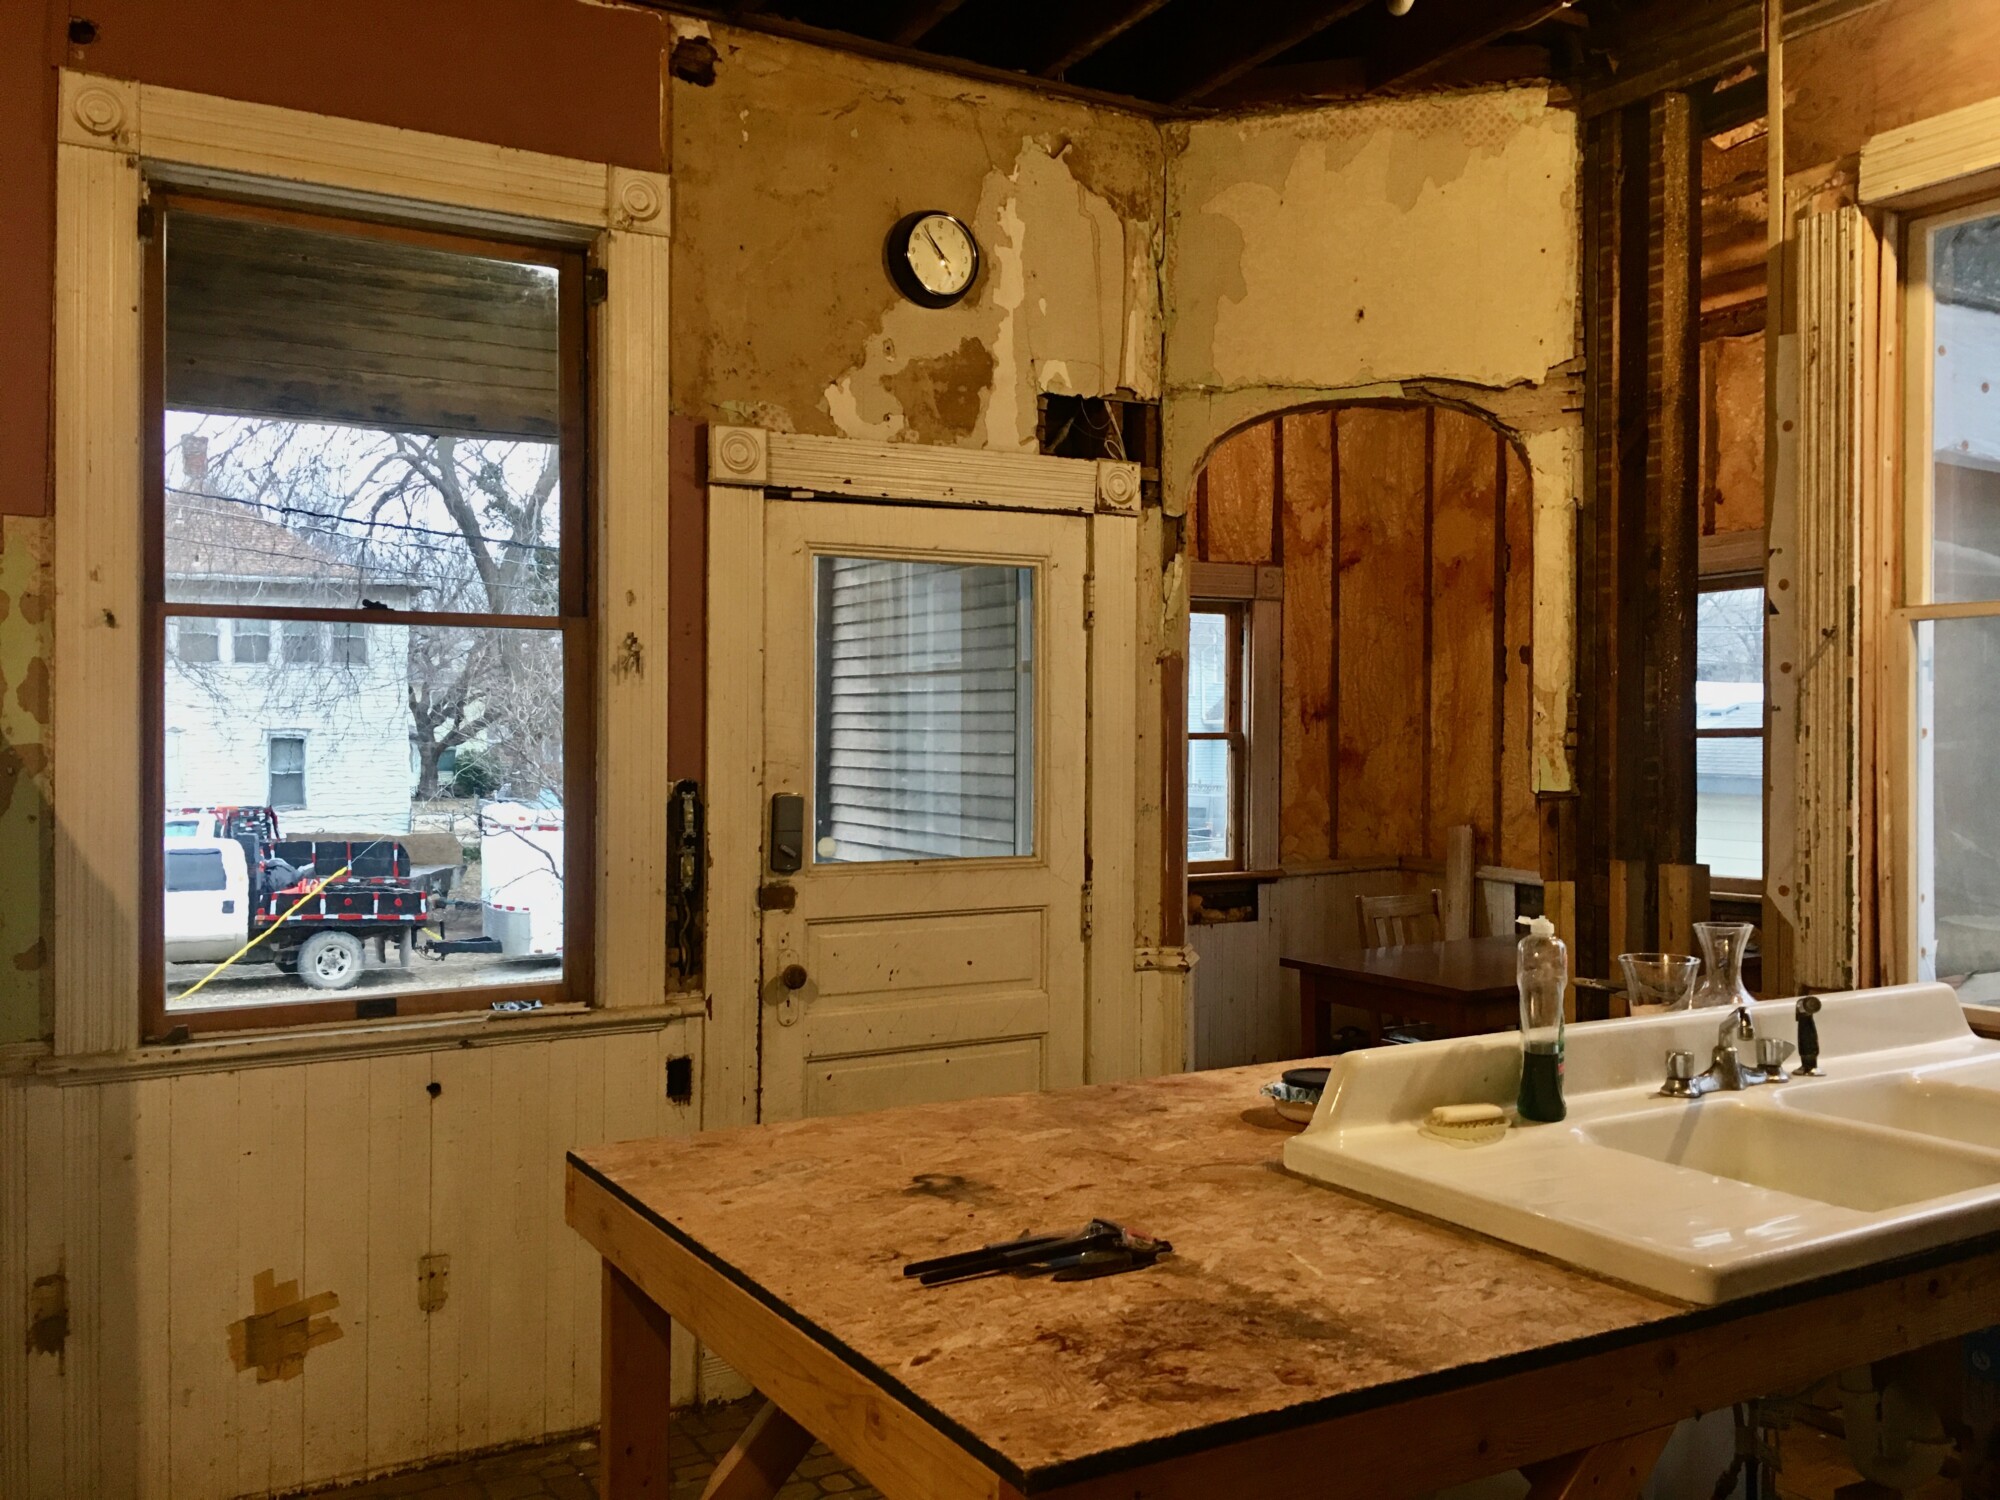
The problem, as I have been pondering, is all the wood in the room. It is CAKED with paint. CAKED. So, trim, wainscoting, and doors.
I have been blessed that in most of the house this is not an issue. But the kitchen? Ugh.
Using a heat gun is out of the question. For, heat guns often burn houses down. Indeed, in 1999 the Cross House was set on fire via a heat gun. Heat guns can also burn wood, which is not an issue if the wood will then be painted but is a huge issue if the wood is to be shellacked.
An infrared stripper? I have never used one. But they vaporize lead and release this into the air. Which is bad. VERY bad.
Regular old paint stripper, which I have used for decades? This works best on trim that has been removed and laid down flat. But I have no desire to remove all the trim, as the process is often damaging.
So, my ponderings have been frustrating.
The other day though the potential ideal solution popped into my dense head: Peel-away stripper!
This is a thick paste with is applied, covered with paper or plastic, and left alone a few days. Then, it is all simply peeled away, revealing bare wood. No lead is vaporized, no lead in scraped and then put into the air, and the resulting mess can simply be taken to a proper disposal facility.

The kitchen is lined with wood wainscoting. CAKED in paint.

A portion though, behind a radiator, was never painted, revealing the original amber shellac. How amazing is this?
So, it seems that peel-away would be the ideal solution for my kitchen.
Have any of you used it? If so, what is your experience?

33 Comments
Leave a Comment
Your email address will NEVER be made public or shared, and you may use a screen name if you wish.
I was under the impression that a speedheater (infrared) stayed below the temps at which lead vaporized. My knowledge come completely from the My Philly Row blog and the podcast he co-hosted (True Tales From Old Houses) with Stacey from Blake Hill House.
This is correct. The big win that infrared has over heat guns is precisely that they do not vaporize lead. Lead vaporizes at about 750F. Heat guns can range from 1,000F-1,200F, whereas infrared strippers run in the range of 600F. Well below the rate at which the lead in paint will vaporize. Yet, hot enough to soften paint quickly making it easy to remove.
I promise you Ross, an investment in a Speedheater Cobra is one you will be very grateful for. They are not cheap, but I have ZERO regrets. They also make AMAZING paint scrapers. I say this as someone who is generally a skeptic and HATES product promotions.
BTW, When you factor in the cost of gallons upon gallons of stripper, the Speedheater’s cost becomes quite economical in comparison. Plus, it is much less messy.
Yes, I soldiered on using my $20 heat gun for years, before finally caving and buying a SpeedHeater Cobra (I think I got it on a sale for about $400).
After using it, my conclusion is that it’s absurdly expensive, but worth every penny.
Another Speedheater fan here, and I got it because of the lead issue. It’s amazing. My only regret is getting the standard size instead of the Cobra. The standard size would probably be great if you were stripping siding, but the Cobra seems like it would be easier to manage for stripping woodwork.
Hi Ross. Wow. That is a lot of wood for sure! I have used the peel-off method on a cast iron fire surround with lots of intricate detail. It worked so well that I cannot imagine going back to using the gloopy paint stripper method.
Colin
The other day when we were talking about the kitchen you had mentioned hating the results of the finishes analysis, but I personally can’t imagine why! I love the color paired with the natural wood. It’s simple, airy, and relaxing.
Hi Cody,
I mentioned that I wasn’t crazy about the wall color.
I’m still not, but plan to paint the kitchen as such.
I love the amber shellac.
Peel away smart strip works like magic in my house! Though, sometimes it requires 2 passes depending on how many layers I am removing. I have raved about it to some friends who tried it and did not get the same magical results, so I suggest getting the sample sizes first. There are a couple of different formulations. I believe you can order a multi pack of sample sizes from dumond to test which formula works best on your particular paint.
Oh dear. Ross my darling, you are a typical man! A heat gun?? Impossible, absurd. Get an ordinary cheap ladies hair dryer. The heat is less, and while the time using might be more, the results are extraordinarily satisfying. YOU control the heat, where it is directed, and how much you apply.
I restore vintage and antique dolls…which are painted with many, many layers of acrylic paint. Latex (acrylic) paint was patented in 1951, so you have approximately 70 years of plastic on that glorious trim. Just aim the hairdryer at the mess at very close range, let it heat until you see the stuff go shiny, then just peel it off the wood. Yes, it does peel like tape, and the beauty of it is that there is absolutely no damage to the underlying wood. Heck, it doesn’t even warm the wood more than a summer’s day. This is something that is not possible with a heat gun.
Let’s face it, a heat gun is a man’s solution to a large area problem. It works for many things, (yes I own one too) but for delicate surfaces it would be better to use the hair dryer. After all, a $10 hair dryer is not a huge investment and it is no loss if the thing burns up. Surprisingly, I still have the original hair dryer I bought for peeling acrylic tile some 25 years ago and it still does the job perfectly. A bonus is that the lead paint underlying will just adhere to the acrylic without vaporizing into the atmosphere.
Isn’t $10 a small price to pay to see if the results are what you want? I know you already have a knife to start the merry peeling of the paint.
Dodi,
I am SO going to try your hair dryer stripping method! I have done buttloads of stripping of trim, and furniture over the years, and I’m ALWAYS disgusted with the outcome, and the freaking MESS!
This comes just in time…. I have a small cabinet with twelve thousand layers of paint that needs to be cleaned up. And now I’m excited about doing it, instead of dreading it.
Thank you!
I know you have made up your mind on the infra red, but they do not cause the lead paint to gas off lead compounds… in fact they are specifically designed not to. A heat gun would on the other hand as it reaches much higher temps. I would recommend a cobra to anybody who wanted to go the heat gun route for trim.
I would use a case of citri-strip on this project if not using infra red
I’m also a new convert to the Cobra heater. It’s been amazing for my window restoration projects.
You do have to be cautious of sharp corners on the wood, as it is possible to scorch it, especially where you’ve already scraped the paint off as you’re moving along.
Getting down to perfectly-clean wood for staining is likely going to require some chemical stripper too. Taking the bulk off with an infrared heater will save a lot of time (and money) in chemical strippers, though.
I used a heat gun to strip a lot of the paint in our house and never had a problem. Just keep the temperature fairly low and keep it moving so it doesn’t get one spot too hot. I also tried the Peel Away stripper and hated it. It worked very badly on the doors we tried it on; it didn’t remove the paint very well and you ended up with all that paper waste. The best chemical stripper we used was the toxic stuff that Home Depot sells, I think it’s called Klean Strip. You already have the safety gear so you should be fine using it.
I used Dumond’s Peel Away product for a door frame with lead paint last summer. It was tremendously satisfying to slough off enormous sections of paint, but it’s also very caustic if you get it on your skin. The surface needs to be neutralized before applying the new finish, and I had to do multiple treatments rinsing with citri-lizer and vinegar to get the surface back to the right PH, which was wet & messy on vertical & overhead surfaces. I let it run off to the outside (it was an exterior door frame… perhaps that was not a good choice, but I figured the soil around the house is already contaminated with lead paint chips and a little more will hardly make a difference). In a kitchen you’d have to figure out how to manage all the rinsing liquid or find a different way to neutralize it.
Jasco used to be amazing for this but they changed the formula. Now it hardly works, so don’t waste your time if you happen across it.
I can’t wait to see more work on the kitchen!
When I stripped the foundation on our last house, I started by buying a small can of every brand/formula of stripper I could find locally, and then tested them all. I did find the Jasco worked really well, but most of the thick Methyl Chloride-based strippers worked pretty similarly.
I have not tried any of the new formulations now that they got rid of methyl chloride. I did hoard a big stash of the original formula when my local store was switching over, though, just in case. It was even cheaper on clearance!
BTW, I also tried some of the citrus strippers (back on the foundation project) and found them to be a horrible disappointment.
I’m jealous of your Jasco hoard! I had no idea there was a switch, and eagerly bought some last year to strip a piece of furniture. Boy was I let down. Also have been disappointed by the citrus strippers.
Are there still methyl chloride strippers on the market? Or have you found something that works well? I feel like I’m out of options.
I would try some of the other solvent-based strippers available now. I have not tried any of the non-methyl chloride formulations myself, though.
This is one commonly available at my local stores:
http://www.kleanstrip.com/product/premium-stripper-non-methylene
Comparing the MSDS sheets, it appears they’ve replaced the methyl chloride with a cocktail of other solvents.
datasheet on new formula: http://www.kleanstrip.com/uploads/documents/GKPS300.pdf
datasheet on old formula: http://www.kleanstrip.com/uploads/documents/GKS3_MSDS.pdf
I would recommend taking all the paint off that you can with an infrared heater (the SpeedHeater Cobra is really great for applications like this, as it’s large enough to cover the width of most trim, but light/nimble enough to use with one hand while you scrape with the other). You do need to be careful not to scorch the wood, especially on corners or sharp ridges of a milled profile, but it’s not as dangerous as a heat gun, since it’s only heating the visible surface. heat guns are dangerous because they’re blasting the hot air into every crack and crevice.
If you’re able to get the bulk of the paint is off with the infrared heater, you may be able to clean the rest off with denatured alcohol and steel wool or scotchbrite pads, as the shellac is still underneath, and will dissolve and take the paint with it.
If there’s still too much paint left to dissolve the shellac, you may need to follow up with a chemical stripper of some type or another. I’d suggest trying a few different ones to get one that works well, without harming the wood.
OK Here I go again. My experience with peel away is that the cloth peels off leaving the chemical paste on the surface to be cleaned off. I have not had luck with it taking the paint with it as I peel it off.
*My paint stripping method is to take paper towels and get them wet, full strength, with the industrial purple cleaner that I buy in five gallon buckets at Home Depot. I lay the wet towels on the surfaces and cover the area with pieces of plastic heavy duty contractor bags. The bags I get are black. After a little while I take the wet towels and move them to another location that needs stripping, while I take a wet plastic scrub brush and use a lot of wood dowels that I have made up by cutting to about eight inches long and sharpening both ends in my pencil sharpener. The dowels do not need to be sharpened to a very fine point except when needed for very fine molded areas and corners. I make up lots of the dowels because it allows me to have a variety of widths on the points. Once washed off, they go back to the pencil sharpener for new points. I keep a bucket of water nearby for wetting and cleaning the brush. I throw the used dowels into the bucket as I use them so they are easy to clean.
The thing to remember is that as long as the chemical is wet, it continues to work. I move the towels around adding cleaner when they start to dry. Also, if the purple cleaner drys, the work may not be a complete waste, but it sure takes almost as long to get the paint off as if you kept it wet.
When I feel that the cleaner has not penetrated the paint enough, I just brush on more cleaner. On horizontal surfaces, I skip the towels and just spread the cleaner and cover in the plastic.
I have a big bucket of water ready to put all tools and materials into so they are easy to clean up. This can be a one step process with the reapplication of chemical, but tight spaces and corners are likely to need additional applications. I have cut old cloth blankets and towels for large areas, but the cleaner breaks up natural fibers like cotton relatively quickly.
Never allow areas that you are working on dry out until you are completely finished cleaning them. Ant area that dries out with paint still on it will take more time to get the paint out if you let the area dry.
Throughout the process, I try to move the debris being picked up to areas that remain to be stripped and cover in plastic. It is my feeling that as long as it is wet it is working. Areas that are started with this debris can be scraped off putting the debris into zip lock plastic bags. You have to decide where you feel the balance is between reusing and throwing away.
On horizontal surface such as floors and doors laid on sawhorses, I skip the towels. I try to do the vertical surfaces first with horizontals available to use still wet debris. The only purpose for the plastic is to keep things wet.
You can use any kind of scraper that you like, just keep in mind that metal tools can cut the wood.
I do a rinse with vinegar to neutralize the PH when I feel that the paint is off because its acidity offsets the base of it. I follow it with a final rinse of water.
I stripped floors that had linoleum glued to the with this method with amazing success. I have left out all safety precautions with the understanding that you can determine what you need to use.
Hey Ross!
We are anti-heat gun too. I wish I could sing the praises of Peel Away, but we were deeply disappointed. We used it on a mantle that had many coats of high-quality oil based paint and it did not work on the first application nor completely on the second application for that matter.
We used it on some exterior trim and the stripper dried out quickly leaving the cloth stuck to the still adhered paint adding to the mess to remove. Compared to other strippers, it’s cost for the amount you get is steep too. Citrus stripper is slow, messy and also proved challenging in detail pieces. I have to wonder about how eco friendly any product is if I have to use many times the amount of it over a single coat of methylene chloride based stripper.
I was super skeptical about the infrared paint strippers especially since they are so expensive. I ordered an infrared element and made one figuring that if lasted just long enough for me to figure out it’s capabilities and if it turned out to be all the wonderful things they are said to be, I would spend the big bucks and buy one. THEY. ARE. AMAZING. They do have some quirks though. They work better on dark colors than light ones because the heat is created at the surface and light colors reflect much of that infrared. Dark green took only a few seconds. Light yellow and white seemed like forever. You can make fumes with one but you really have to be trying or completely careless. Using a piece of shiny aluminum as a mask, you can safely use one next to glass or adjacent materials that you don’t want to strip, unlike a heat gun. We used it all summer on the exterior trim and were always amazed with the results.
Good luck!
Hi Ross, I have zero to add about the strippers. Good luck with that job.
I’m writing to say YAY for work on the kitchen!!! I am beside myself with excitement to see your progress and your decorating choices. I lived in my house without a kitchen for 3 years (!) while I searched out the perfect vintage sink. I’m still searching for someone to create stainless countertops.
It’s so satisfying to get exactly what you want for a space. I know you’re a patient man. You will make it all come together.
I’m so grateful to be invited along for the ride.
Cheers!!
I haven’t used peel-away myself but two handsome boys I follow on Instagram (@mytinyestate) often use it in their restoration work. They’ve used it for external window frames and all sorts, so I’d recommend having a look at what their results. But of course being in the UK, it’s a very different climate to Kansas! I know whatever method you use Ross, in the end the trim will be crisp and beautiful x
Katie, I, too, have been keeping up with those two handsome boys! Their project is fascinating!
It is! The British version of the Cross House 🙂 along with @totheshireborn. I love this blog but I do kinda wish you were on Instagram, Ross. I would follow your stories avidly – the house, the baby steps method (TM), restored lighting, the cats!!! It would be a time sink for you though.
Hi Ross!
I have not used Peel-Away Stripper (yet) but I have a bucket sitting in my garage for use on some exterior trim this spring. One thing I have heard you need to be VERY CAREFUL about is that some of the peel-away formulas will stain the wood a darker color, which is fine if the wood is painted. Since you’re using a shellac, I would test the stripper in an inconspicuous area to see if it does/does not stain your wood darker.
I haven’t used Peel Away but I have used the company’s other product Smart Strip. I’ve heard from other people in the DIY community that if you want to stain the wood you need to use Smart Strip and NOT Peel Away. It does something to the wood that isn’t good for staining (might be true with using dye as well). I LOVE Smart Strip. I hate how expensive it is but it works so well. I once was stripping paint off metal railings and ran out of Smart Strip and switched to Citra Strip so I could get it done right away, what Smart Strip did in one application it took Citra Strip 3 applications (plus Citra Strip was super runny and got on my wood work and I had extra work refinishing that ugh). I do think there is somewhat of a learning curve. It needs to go on very thick, the directions say like you are icing a cake. I also add plastic over it because it needs to stay moist, I’ve used garbage bags for big areas and saran wrap for smaller areas so you don’t need to invest in their paper. Good luck!!
Oh I forgot to add timing is key on it working well too. It needs to be on long enough to work but not too long that it it dries out. I usually keep it on 8-12 hours.
I don’t have any personal experience with using steam for paint removal, but have read good things about it from a restoration professional. You can find out more here:
Steam Paint Removal (with video)
Or if you prefer just Google “steam paint removal” and you’ll find many more results.
Having trouble leaving a link:
http://historichomeworks.com/forum/viewtopic.php?p=434
Thank you, Alex! I will look at that.
You may want to try Coopers Strip Club from Australia/New Zealand. You spray it on let it sit and the paint comes off easily and requires no sanding after removing the paint. I came across it while watching YouTube videos of a gentleman restoring an 1890s house in St. Louis (his channel is The second empire strikes back)
I tried Peel away 1 and was not impressed. Then I talked to some painters up the street who worked for one of the best house painting companies here in Bham AL. They did all per the directions and had adhesion problems with their paint job. I use a speedheater(infrared) and a heat gun outside. I find that if you leave the speedheater on there long enough to do the trick it gets plenty hot to even ignite the paint. So yeah in theory it is supposed to be operating under the combustion temp of lead but i just do not find that it works on 100+ years worth of paint if it is not left on there a pretty good while. I wear a respirator with the proper cartridges for burning lead fumes, 3M 2091. The speedheater does not work well at all on my stucco panels, as it works by heating up the substrate and then releasing the bottom layer of paint. The stucco is just too slow to heat up, whereas on wood it works pretty well.